Welcome to IC Hack! Get ready for 24 hours of intense coding. Every year, our hackers come from different backgrounds and all kinds of prior programming experience. Some of you may be experienced programmers who've been to many hackathons before while some may be complete beginners; this HackPack aims to get your technical setup ready for hacking, especially if you have not coded before!
An Integrated Development Environment (IDE) is a software application that provides and combines the necessary tools for programming, like code editor, debugger, compiler, and more, into a single graphical user interface. Generally, we write our code in IDEs rather than plain text editors as it can increase programmer productivity with the tools.
We recommend using Visual Studio Code (VS Code) for development which is also fairly easy to setup.
Note
If you are a complete beginner to programming, we would recommend you read the later section on choosing a programming language first; if you wish to use JVM languages (e.g. Java, Kotlin, Scala) then you should consider using IntelliJ IDEA, or in the case of Android Development using Kotlin, Android Studio. For other use cases, Visual Studio Code is fine.
Important
Part of this material is adapted from the VS Code Docs.
- Install VS Code according to your operating system (for most people, this will be Windows or macOS).
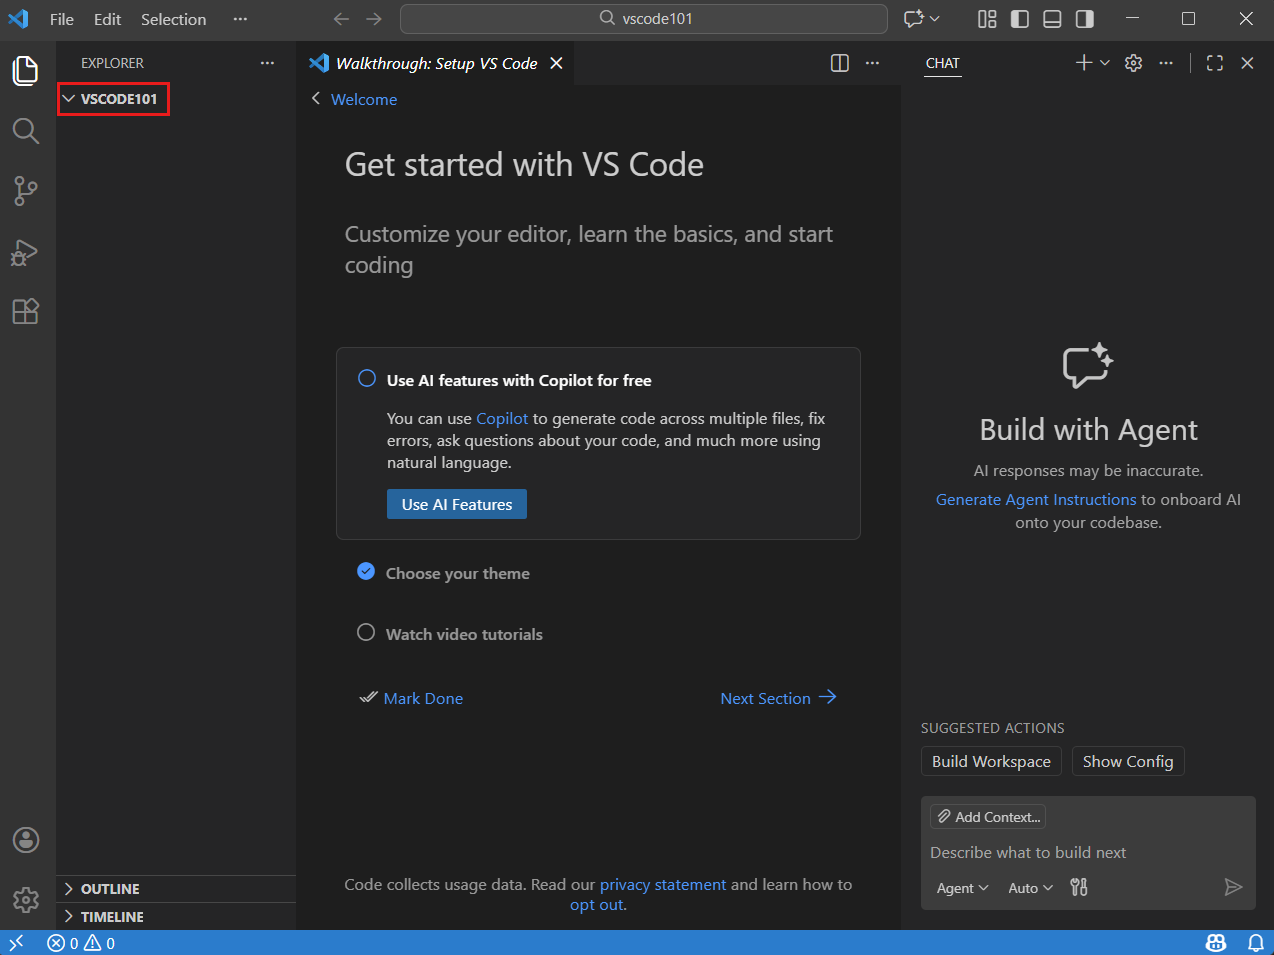
- Follow the instructions on the installer. When you launch VS Code post-installation, it should look similar to this:
- Feel free to try opening/creating a new file and start coding!

- Once you get VS Code up and running, we recommend installing a few more pieces of software and plugins:
- Git. Follow the instructions on the installer. For detailed use of Git, check out our HackPack. On VS Code, we use the Source Control feature to manage Git (the third icon on the left hand sidebar).
- Extensions for whichever programming languages you use. For example, if you want to install the extension for Python, you can go to the Extension icon on the left hand sidebar and search for
Python:
- Access to your favourite LLMs! VS Code has GitHub Copilot built-in from an icon on the top bar; also see later section on how to gain free Pro access:
 You can integrate other LLMs into VS Code through the extensions as well:
 Codexfor OpenAI (ChatGPT),Claude Code for VS Codefor Anthropic (Claude),Gemini Code Assistfor Google (Gemini). If you don't mind setting up API keys, thenClineis a good one as well. See our prompt engineering HackPack for more info on how to get the most of those LLMs!


Note
Don't be afraid to pick up new programming languages - our prompt engineering HackPack combined with LLMs can help you get started on new languages quickly!
Now we have our IDE set up, we can decide what language to use for the rest of IC Hack! The decision tree below can help you choose a suitable language based on your use case:
graph TD
    Start["START: What are you building?"] --> Decision{"Choose your Project Type"}

    %% Branch 1: Data/ML
    Decision -- "Data / Machine Learning" --> DataEnd["Python"]

    %% Branch 2: Mobile
    Decision -- "Mobile App" --> MobileOS{"Which Mobile OS?"}
    MobileOS -- Android --> KotlinEnd["Kotlin"]
    MobileOS -- iOS --> SwiftEnd["Swift"]

    %% Branch 3: Frontend
    Decision -- "Frontend (Web UI)" --> Fe["Click to see our Frontend HackPack"]

    %% Branch 4: Backend
    Decision -- "Backend (Server/API)" --> Be["Click to see our Backend HackPack"]

    click Fe "https://github.com/icdocsoc/ichack-hackpacks/blob/main/frontend-development/README.md"
    click Be "https://github.com/icdocsoc/ichack-hackpacks/blob/main/api-design/README.md"
A lot of this depends as well on the experience level of your teammates, so make sure to discuss the choice of language/frameworks between yourselves.
First, download the installer.
Important
The following assumes knowledge of terminal commands. You may wish to read this section before coming back and continuing from here.
If you want to install individual Python packages (these may be ones you see in our other HackPacks for machine learning, backend development, etc.), you can do so with the terminal command pip install <package-name>.
Alternatively, you can list all the packages and the versions that you wish to install in a file named requirements.txt, and then do pip install -r requirements.txt to install all the listed packages.
Developers often find virtual environments in Python useful as it allows different programmers to share the same setup (in particular, having the same versions of packages installed), and makes the installation process more standardised.
To share and set up a virtual environment:
- Run
pip freeze > requirements.txt. This saves the versions of all current Python libraries installed ontorequirements.txt, and you can share this text file with your team members. - Once you have the
requirements.txtfile, runpython -m venv <path_to_env>to create a new virtual environment. - To activate the virtual environment, run
<path_to_env>\Scripts\activate.bat(Windows Command Prompt) or<path_to_env>\Scripts\Activate.ps1>(Windows PowerShell) orsource <path_to_env>/bin/activate(other terminal shells). You will then see the environment activated, and its name prepended to your terminal. - Once you're in the virtual environment, if you have not installed packages on this environment before, run
pip install -r requirements.txt(as in the section above). - Start coding - you now have the same setup as everybody else!
- You can leave the virtual environment by typing
deactivatein the terminal.
Scroll down on the node.js download page until you see "Or get a prebuilt Node.js for Windows running a x64 architecture". Switch the operating system and architecture to your computer's before downloading the installer.
This allows you to run JavaScript applications (in frameworks like React), and most importantly you get the npm package manager (similar to pip in Python) for external packages.
Important
The following assumes knowledge of terminal commands. You may wish to read this section before coming back and continuing from here.
To install individual packages, run npm install package-name.
Similar to requirements.txt in Python, you might also have a package.json file that lists all the required packages and versions, then run npm install to install all the listed packages.
As programmers, we often have to work with the terminal to perform various tasks. To access your computer's terminal, you can either
- Windows: Type
Powershellin Windows search. - macOS: Type
Terminalin Spotlight. - VS Code:
Ctrl+Shift+'on Windows, orCtrl+Shift+`on macOS.
You will then get something like this:

You might find some of these commands useful. They work on both the Windows PowerShell and macOS Terminal.
Warning
If you're on Windows, don't get the PowerShell mixed up with Command Prompt. They are different applications!
| Action | Command |
|---|---|
| Show current folder | pwd |
| List files in current location | ls |
| Change to a different folder/directory | cd [folder_name] |
| Go back to parent folder/directory | cd .. |
| Make new folder | mkdir [folder_name] |
| Delete file | rm [filename] |
| Move file | mv [filename] [folder_name] |
| Copy file | cp [filename] [folder_name] |
| Run multiple commands at once | [command_1] && [command_2] |
For Git-specific commands, refer back to our Git HackPack!
- Read the HackPacks that may be relevant to your project!
- Use our Discord. We have mentors on-call throughout to help you in
#coach-support! - Make good use of Google, Stack Overflow and your favourite LLMs to answer your technical questions if you're unable to reach us.
Students gain free access to GitHub Copilot Pro as part of the GitHub Student Developer Pack - we strongly encourage you to sign up to make use of the increased usage limits and advanced models!
It could take a few days to verify your student status, so we would advise you to sign up before IC Hack in order for it to be approved in time for the weekend. You may find the application instructions here.
Make sure to do the following before applying (else you may get rejected):
- Your GitHub display name matches your student ID name;
- You have enabled multi-factor authentication on your GitHub account;
- You have included a billing address on your GitHub account.
- Backend development: API Design, Databases, Python (Django), Machine Learning
- Frontend development: ReactJS, Vue.js
- Android app development: Android Development
- How to get the most out of the hackathon: Project planning, Engaging with sponsors
- Preparing for submission & judging: Pitching and presenting, DevPost submission guide