npm install --save react-native-octodb
Then follow the instructions for your platform to link react-native-octodb into your project
Run:
cd ios && pod install && cd ..
(linking is not required in React Native 0.60 and above)
Add this to your Podfile which should be located inside the ios project subdirectory
pod 'React', :path => '../node_modules/react-native'
pod 'react-native-octodb', :path => '../node_modules/react-native-octodb'
Or use the sample Podfile included in the package by copying it over to ios subdirectory and replacing AwesomeProject inside of it with the name of your RN project.
Refresh the Pods installation
pod installOR
pod updateDone, skip to Step 2.
This command should be executed in the root directory of your RN project
react-native linkrnpm and xcode are dependencies of this project and should get installed with the module but in case there are issue running rnpm link and rnpm/xcode are not already installed you can try to install it globally as follows:
npm -g install rnpm xcodeAfter linking project should like this:

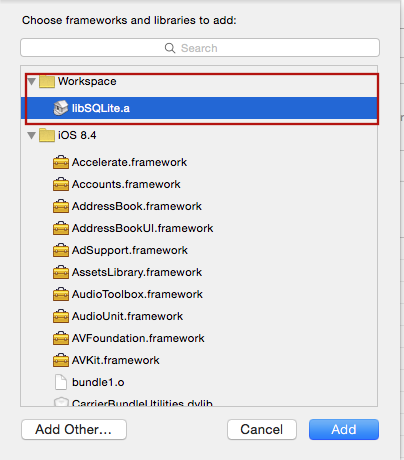
Step 1a. If rnpm link does not work for you you can try manually linking according to the instructions below:
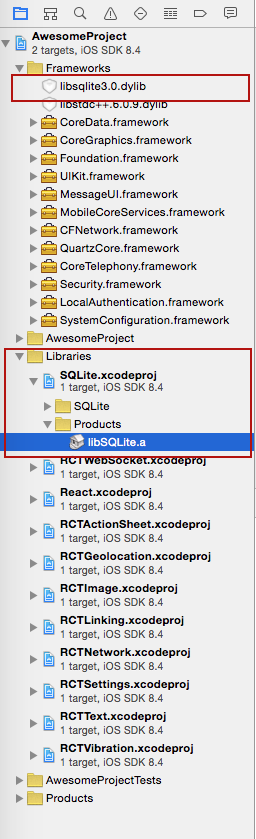
Add libSQLite.a (from Workspace location) to the required Libraries and Frameworks. Also add sqlite3.0.tbd (XCode 7) or libsqlite3.0.dylib (XCode 6 and earlier) in the same fashion using Required Libraries view (Do not just add them manually as the build paths will not be properly set)
Add var SQLite = require('react-native-octodb') to your App.js
Add JS application code to use the SQLite plugin in your App.js
Here is a sample code:
errorCB(err) {
  console.log("SQL Error: " + err);
},

successCB() {
  console.log("SQL executed fine");
},

openCB() {
  console.log("Database OPENED");
},

var db = SQLite.openDatabase("test.db", "1.0", "Test Database", 200000, openCB, errorCB);
db.transaction((tx) => {
  tx.executeSql('SELECT * FROM Employees a, Departments b WHERE a.department = b.department_id', [], (tx, results) => {
    console.log("Query completed");

    // Get rows with Web SQL Database spec compliance
    var len = results.rows.length;
    for (let i = 0; i < len; i++) {
      let row = results.rows.item(i);
      console.log(`Employee name: ${row.name}, Dept Name: ${row.deptName}`);
    }

    // Alternatively, you can use the non-standard raw method
    /*
    let rows = results.rows.raw(); // shallow copy of rows Array
    rows.map(row => console.log(`Employee name: ${row.name}, Dept Name: ${row.deptName}`));
    */
  });
});
For full working example see test/index.ios.callback.js. Please note that Promise based API is now supported as well with full examples in the working React Native app under test/index.ios.promise.js
There are no extra steps
Located under Gradle Settings in Project Panel
File: android/settings.gradle
include ':react-native-octodb'
project(':react-native-octodb').projectDir = new File(rootProject.projectDir, '../node_modules/react-native-octodb/platforms/android') // react-native-octodb >= 4.0.0
// IMPORTANT: if you are working with a version less than 4.0.0 the project directory is '../node_modules/react-native-octodb/src/android'Located under Gradle Settings in Project Panel
File: android/app/build.gradle
dependencies {
    ...
    implementation project(':react-native-octodb')
}This should work on React version but if it does not, try the ReactActivity based approach
Note: for version 3.0.0 and below you would have to pass in the instance of your Activity to the SQLitePluginPackage constructor
...
import org.pgsqlite.SQLitePluginPackage;

public class MainActivity extends Activity implements DefaultHardwareBackBtnHandler {

    private ReactInstanceManager mReactInstanceManager;
    private ReactRootView mReactRootView;

    @Override
    protected void onCreate(Bundle savedInstanceState) {
        super.onCreate(savedInstanceState);
        mReactRootView = new ReactRootView(this);
        mReactInstanceManager = ReactInstanceManager.builder()
                .setApplication(getApplication())
                .setBundleAssetName("index.android.bundle")  // this is dependant on how you name you JS files, example assumes index.android.js
                .setJSMainModuleName("index.android")        // this is dependant on how you name you JS files, example assumes index.android.js
                .addPackage(new MainReactPackage())
                .addPackage(new SQLitePluginPackage())       // register SQLite Plugin here
                .setUseDeveloperSupport(BuildConfig.DEBUG)
                .setInitialLifecycleState(LifecycleState.RESUMED)
                .build();
        mReactRootView.startReactApplication(mReactInstanceManager, "AwesomeProject", null); //change "AwesomeProject" to name of your app
        setContentView(mReactRootView);
    }
...
Alternative approach on newer versions of React Native (0.18+)
Note: for version 3.0.0 and below you would have to pass in the instance of your Activity to the SQLitePluginPackage constructor
import org.pgsqlite.SQLitePluginPackage;

public class MainApplication extends Application implements ReactApplication {
  ...

  /**
   * A list of packages used by the app. If the app uses additional views
   * or modules besides the default ones, add more packages here.
   */
    @Override
    protected List<ReactPackage> getPackages() {
      return Arrays.<ReactPackage>asList(
        new SQLitePluginPackage(),   // register SQLite Plugin here
        new MainReactPackage());
    }
}File: index.android.js
var React = require('react-native');
var SQLite = require('react-native-octodb')
See full examples (callbacks and Promises) in the test directory