Home
Welcome to the pmd-designer wiki!
The rule designer is both a way to inspect the tree on which PMD rules run on, and to write XPath rules in an integrated manner. This page describes the features that enable this.
You can enter source code in the middle zone.
- Make sure to select the correct language and version for your source code:
- Language is set app-wide with the blue button in the menu-bar
- If the language has several language versions, you can select a specific one with the choicebox just above the code area
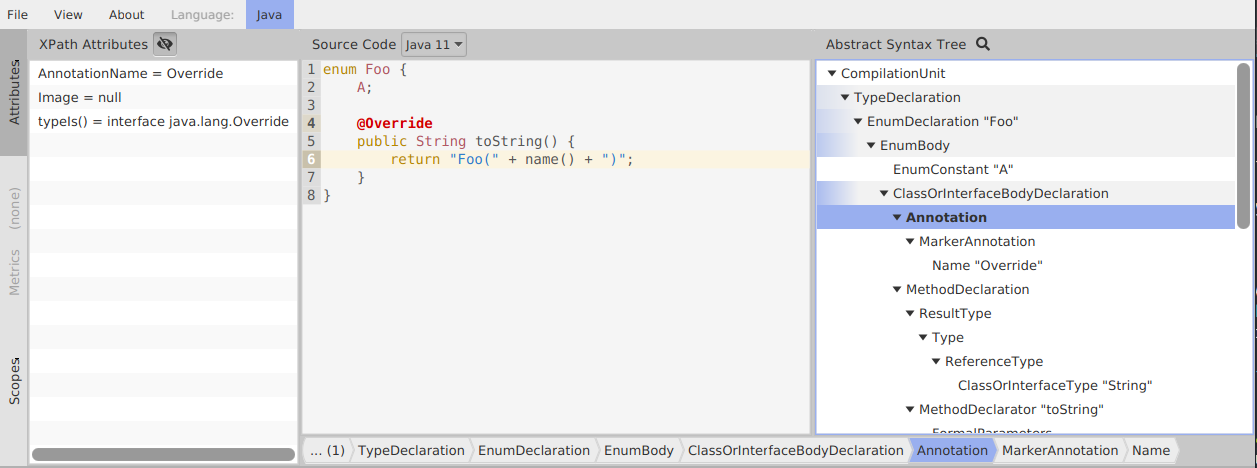
- If the source is valid using this setting, the tree to the right will update to display the AST of the code
- When selecting a node, the left panel updates with information about a node
There are several ways to focus a node for inspection:
-
From the tree view: just click on an item
- Since 6.16.0, the tree view is also searchable: press CTRL+F when it's focused, or click on the
Search🔎 button and enter a search query. You can cycle through results withCTRL+TABorCTRL+F3, and cycle back withCTRL+SHIFT+TABorCTRL+SHIFT+F3
- Since 6.16.0, the tree view is also searchable: press CTRL+F when it's focused, or click on the
- From the crumb bar: the crumb bar below the code area shows the ancestors of the currently selected node, and is empty if you have no selection:

- From the source code: maintain CTRL for a second until the code area becomes mostly blue. Then, each node you hover over on the code area will be selected automatically. Example:

The left panel displays the following information:
- XPath attributes: this basically are all the attributes available in XPath queries. Those attributes are wrappers around a Java getter, so you can obtain documentation on the relevant Javadoc (that's not yet integrated into the designer)
- Metrics: for nodes that support it, the values of metrics are displayed in this panel
- Scopes: This is java specific and displays some representation of the symbol table. You mostly don't need it. If you select eg a variable id, its usages are already highlighted automatically without opening the panel:

The bottom part of the UI is dedicated to designing XPath rules:

The center is an XPath expression. As you type it, the matched nodes are updated on the right, and highlighted on the code area. Autocompletion is available on some languages.
Note: you can keep several rules in the editor (there's a tab for each of them).
Above the XPath expression area, the "Properties" button allows you to define new properties for your prototype rule. You can also edit the existing properties.
When you click on it, a small popup appears:

The popup contains in the center a list of currently defined properties, displaying their name and expected type.
- Adding: the "Add property" button adds a row to the table
- Deleting: each item has a "Trash" button to delete the property
- Editing: each property can be further edited by clicking on the "Ellipsis" button on the right
The edition menu of a property looks like the following:

- You can edit the name, description, expected type, and default value of the property
- All this information is exported with the rule definition (see Exporting to an XML rule)
- The default value is used unless you're editing a test case, and you set a custom value for the test case. TODO link
The little export icon next to the gear icon opens a menu to export your rule. This menu lets you fill-in the metadata necessary for an XPath rule to be included in a ruleset.

PMD has its own XML format to describe rule tests and execute them using our test framework. The designer includes a test editor, which allows you to edit such files or create a new one directly as you edit the rule. This is what the panel left of the XPath expression area is for.
A rule test describes
- the configuration of the rule
- the source on which to run
- the expected violations
- a description (to name the test)
When executing a test, the rule is run on the source with the given configuration, then the violations it finds are compared to the expected ones.
Tests can be added in one of four ways:
- From an XML file: if you already have a test XML file for your tests, you can load all the tests it defines easily:

-
From the current source: A new test case with a default configuration is created, with the source that is currently in the editor
-
With an empty source: A new test case with a default configuration is created, with an empty source file. You must edit the source yourself then.
-
From an existing test case: Each test case list item has a "Copy" button which duplicates the test and loads the new one.
In the designer, the test panel is a list of test cases. Their status (passing, failing, error, unknown) is color coded.
Test status color coding examples
All tests passing (green):

A failing test (orange):

Each test has a piece of source, which you can edit independently of the others, when the test is loaded in the editor. Additional rule configuration options can be chosen when the test is loaded.
Loading is done with the Load button:

Only one test case may be loaded at a time. If the loaded test is unloaded, the editor reverts back to the state it had before the first test case was loaded.
When a test is loaded, the source you edit in the code area is the source of the test. Changes are independent from other tests, and from the piece of source that was previously in the editor.
When a test is loaded, an additional toolbar shows up at the top of the code area:

The "Expected violations" button is used to add or edit the expected violations.
Initially the list of violations is empty. You can add violations by dragging and dropping nodes onto the button or its popup, from any control that displays nodes. For example:

Rule properties can be configured for each test case independently using the "Property mapping" button. For example:

-
Available languages: the
pmd-uijar doesn't include any PMD language module, but picks up on the language modules that are on its the classpath of its VM.- You also need a compatible
pmd-core. For now, newer designer (eg 6.15.0) supportpmd-core+ languages as old as version 6.11.0. This will be clarified in the app someday.
- You also need a compatible
-
Main class: The main class of the app is
net.sourceforge.pmd.util.fxdesigner.DesignerStarter, and not theDesignerclass in the same package. - Settings management: application state is for now saved in a file somewhere in a sub directory of your user home directory. You can verify exactly where by opening the menu About > About. The format of this file is not public API and is subject to change between minor versions of the designer, until we may figure out a more flexible persistence scheme.