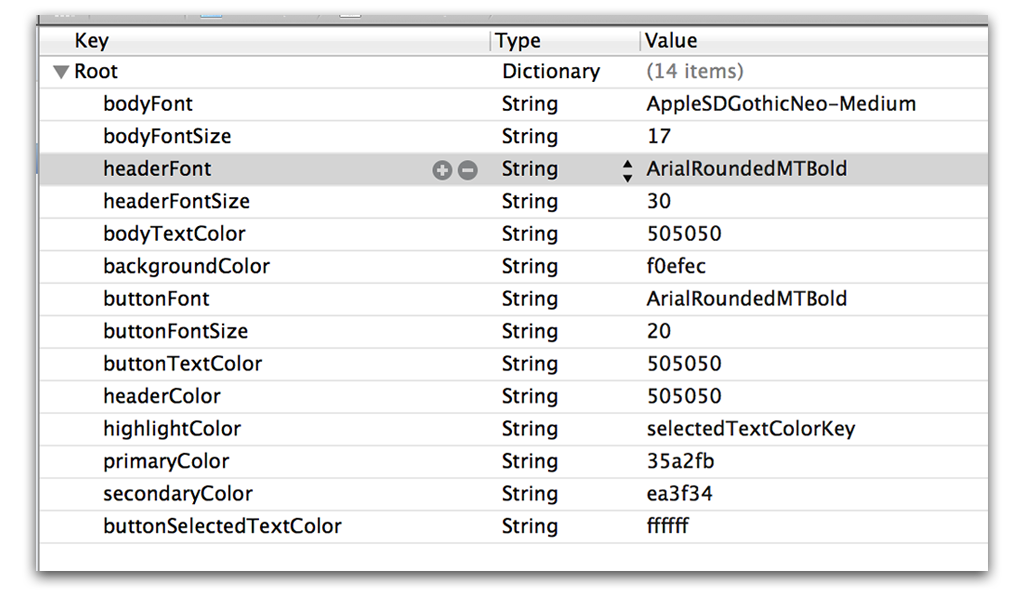
This small utility makes theming your iOS apps clean and simple. It was originally created so that I could have themable NIBs that utilized notifications to update view properties such as fonts and colors. I pushed beyond NIB support so that however you create your views, it will respond to your themes.
I also wanted to create a library that could be used by people that aren't app developers, i.e. designers. As long as someone has Xcode installed, they can easily make edits to your theme Plists without slowing down the development process.
The preferred method of installation is with Cocoapods. The latest version is 0.1.0.
If you do not wish to use Cocoapods (and you really should), you can manually install RNThemeManager by just dragging and dropping all of the source files into your project. There are no framework dependencies.
The only required setup is that you create a Plist file named default.plist. The root of this file should be a dictionary. Each key represents the name of an attribute. Values should be either the name of a font, the size of a font, or a hex color code.
View a list, and examples, of fonts included with iOS 6 here.
You can include custom fonts in your project and use them in your themes just as you would with a system font. For instructions on importing custom fonts see this Stackoverflow answer.
RNThemeManager automatically builds your font and size based on the keyword for the font. Each font name must be accompanied by a font size key that is the font name suffixed with "Size". For example:
headerFont : ArialRoundedMTBold
headerFontSize : 24
Then when assigning a font key to a label (or any other view with text), the size will be automatically assigned.
- (UIFont *)fontForKey:(NSString*)key;Colors are fairly simple. Just use a hexidecimal color code for the key value. There is no need to prefix with #.
- (UIImage *)imageForKey:(NSString *)key;Just like [UIImage imageNamed:@"name"], simply assign the image name of your asset as the value for an image key.
- (UIImage *)imageForKey:(NSString *)key;If you would like to use a single value as multiple keys you may, just set the value of a key to another key.
headerFont : Helvetica
headerFontSize : 20
backgroundColor : ffffff
redColor : d81417
headerColor : backgroundColor
headerButtonColor : headerColor
cellHeaderFontSize : headerFontSize
buttonBackgroundColor : redColor
// etc
There are three steps to applying themes within NIBs. All of this is done in the Identity Inspector (⌥ ⌘ 3).
- Class a view as a respective
RNTheme*subclass. You can subclass any of theRNTheme*classes as well. - Setup keyPath keys that match the
RNTheme*subclass. - Set the values to said keyPaths to the keys you defined in your theme plists.
Sorry if that's a little confusing. Here are some pictures.
@interface RNThemeButton : UIButton
<RNThemeUpdateProtocol>

// available theme keys
@property (nonatomic, strong) NSString *backgroundImageKey;
@property (nonatomic, strong) NSString *backgroundColorKey;
@property (nonatomic, strong) NSString *fontKey;
@property (nonatomic, strong) NSString *textColorKey;
@property (nonatomic, strong) NSString *highlightedTextColorKey;

@end// optional: conform your View or ViewController to provided protocol
@interface MYViewController : UIViewController
<RNThemeUpdateProtocol>
// in -viewDidLoad (remember to removeObserver in -dealloc)
[[NSNotificationCenter defaultCenter] addObserver:self action:@selector(applyTheme) withObject:nil];
// in -viewWillAppear (or where you do your layout bits)
[self applyTheme];
- (void)applyTheme {
// these objects do _not_ need to be RNTheme* classes/subclasses
self.view.backgroundColor = [[RNThemeManager sharedManager] colorForKey:@"backgroundColor"];
self.textField.font = [[RNThemeManager sharedManager] fontForKey:@"textFieldFont"];
// example of custom theming
self.textField.layer.cornerRadius = [RNThemeManager sharedManager].styles[@"cornerRadius"].floatValue;
}Now whenever your theme file is changed the ViewController will automatically restyle your views based on your theme's setup.
To change the active theme, just call the following method:
[[RNThemeManager sharedManager] changeTheme:@"lowcontrast"];Just make sure you have a plist with whatever theme name you provide.
All RNTheme* subclasses subscribe to notifications when a theme is changed and conform to a custom protocol (that only exists for semantics) called RNThemeUpdateProtocol.
If you wish not to use any of the RNTheme* views (and you certainly do not need to), you can update your views or even view controllers by listening for the following notification:
RNThemeManagerDidChangeThemesSee the above example of Theming With Code for how to implement.
- @nystrorm on Twitter
- @rnystrom on Github
- rnystrom [at] whoisryannystrom [dot] com
RNThemeManager is a work from Ryan Nystrom under the MIT license. See the license doc for details.

