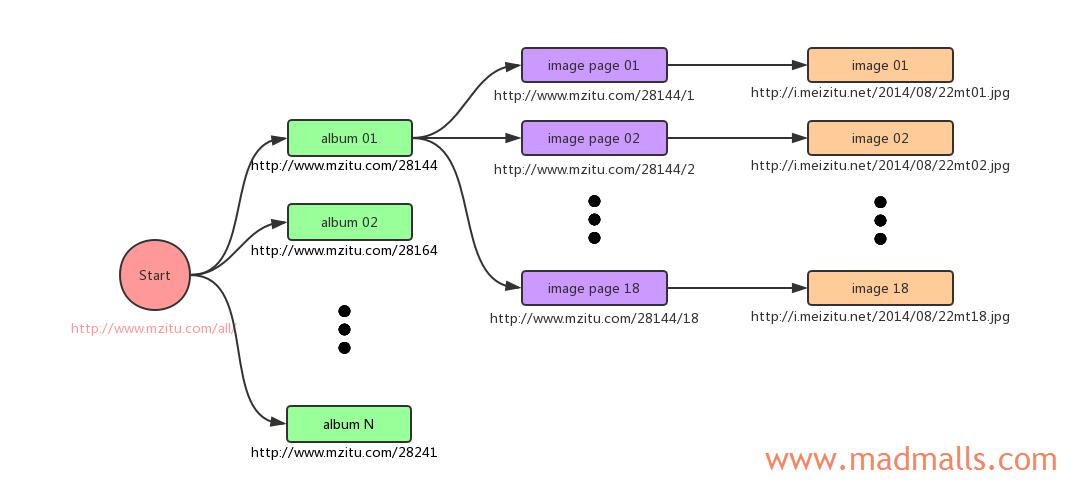
分析爬取的过程:
- Python 3 爬虫|第1章:I/O Models 阻塞/非阻塞 同步/异步
- Python 3 爬虫|第2章:Python 并发编程
- Python 3 爬虫|第3章:同步阻塞下载
- Python 3 爬虫|第4章:多进程并发下载
- Python 3 爬虫|第5章:多线程并发下载
- Python 3 爬虫|第6章:可迭代对象 / 迭代器 / 生成器
- Python 3 爬虫|第7章:协程 Coroutines
- Python 3 爬虫|第8章:使用 asyncio 模块实现并发
- Python 3 爬虫|第9章:使用 asyncio + aiohttp 并发下载
- Python 3 爬虫|第10章:爬取少量妹子图
- Python 3 爬虫|第11章:爬取海量妹子图
- Python 3 爬虫|第12章:并发下载大文件 支持断点续传
此代码库中只有低速同步下载版本,协程高速版本请访问: https://madmalls.com/blog/post/python3-concurrency-pics-02/
[root@CentOS ~]# git clone https://github.com/wangy8961/python3-concurrency-pics-02.git
[root@CentOS ~]# cd python3-concurrency-pics-02/如果你的操作系统是Linux:
[root@CentOS python3-concurrency-pics-02]# python3 -m venv venv3
[root@CentOS python3-concurrency-pics-02]# source venv3/bin/activate
Windows激活虚拟环境的命令是:venv3\Scripts\activate
如果你的操作系统是Linux:
(venv3) [root@CentOS python3-concurrency-pics-02]# pip install -r requirements-linux.txt如果你的操作系统是Windows(不会使用uvloop):
(venv3) C:\Users\wangy> pip install -r requirements-win32.txt由于图片有16万多张,所以测试的时候,你可以指定只下载100个图集来对比同步下载、多线程下载和异步下载的效率区别,修改以下三个脚本中的TEST_NUM = 100
建议每次测试完,都删除相关目录:
(venv3) [root@CentOS python3-concurrency-pics-02]# rm -rf downloads/ logs/ __pycache__/删除数据库记录:
(venv3) [root@CentOS python3-concurrency-pics-02]# mongo
MongoDB shell version v3.6.6
connecting to: mongodb://127.0.0.1:27017
...
> show dbs
admin   0.000GB
config  0.000GB
local   0.000GB
mzitu   0.036GB
> use mzitu
switched to db mzitu
> db.dropDatabase()
{ "dropped" : "mzitu", "ok" : 1 }
> show dbs
admin   0.000GB
config  0.000GB
local   0.000GB
> (venv3) [root@CentOS python3-concurrency-pics-02]# python sequential.py(venv3) [root@CentOS python3-concurrency-pics-02]# python threadpool.py(venv3) [root@CentOS python3-concurrency-pics-02]# python asynchronous.py


