Docker images for FileBot.
filebotcommand-line tool (Dockerfile)filebot-nodeweb application (Dockerfile)filebot-watchercommand-line tool (Dockerfile)filebot-xpraremote desktop environment (Dockerfile)filebot-projectorweb renderer (Dockerfile)filebot-webdavwebdav server (Dockerfile)
The filebot command-line tool.
# Run `filebot -script fn:sysinfo`
docker run --rm -it -v "data:/data" -v "$PWD:/volume1" rednoah/filebot -script fn:sysinfo
# docker-compose.yml
version: '3.3'
services:
filebot:
container_name: filebot
image: rednoah/filebot
volumes:
- data:/data
- /path/to/files:/volume1
command: -script fn:sysinfoFileBot Node allows you to call the amc script via a simple web interface.
docker run --rm -it -v "data:/data" -v "$PWD:/volume1" -p 5452:5452 rednoah/filebot:node# docker-compose.yml
version: '3.3'
services:
filebot-node:
container_name: filebot-node
image: rednoah/filebot:node
restart: unless-stopped
volumes:
- data:/data
- /path/to/files:/volume1
ports:
- 5452:5452Once the FileBot Node Service is running, you can access the web interface via http://localhost:5452/filebot/. You can create prepared tasks via Execute ➔ Schedule and then execute them remotely via curl http://localhost:5452/task?id=${TASK_ID}.
You may secure the FileBot Node Service by using HTTPS and BASIC authentication:
docker run --rm -it -v "data:/data" -v "$PWD:/volume1" -e FILEBOT_NODE_AUTH=BASIC -e FILEBOT_NODE_AUTH_USER=YOUR_USERNAME -e FILEBOT_NODE_AUTH_PASS=YOUR_PASSWORD -p 5452:5452 -v /etc/ssl:/etc/ssl:ro -e FILEBOT_NODE_HTTPS=YES -e FILEBOT_NODE_HTTPS_PORT=5453 -e FILEBOT_NODE_HTTPS_KEY=/etc/ssl/private/server.key -e FILEBOT_NODE_HTTPS_CRT=/etc/ssl/certs/server.crt -p 5453:5453 rednoah/filebot:node# docker-compose.yml
version: '3.3'
services:
filebot-node:
container_name: filebot-node
image: rednoah/filebot:node
restart: unless-stopped
volumes:
- data:/data
- /path/to/files:/volume1
- /etc/ssl:/etc/ssl:ro
ports:
- 5452:5452
- 5453:5453
environment:
- FILEBOT_NODE_AUTH=BASIC
- FILEBOT_NODE_AUTH_USER=YOUR_USERNAME
- FILEBOT_NODE_AUTH_PASS=YOUR_PASSWORD
- FILEBOT_NODE_HTTPS=YES
- FILEBOT_NODE_HTTPS_PORT=5453
- FILEBOT_NODE_HTTPS_KEY=/etc/ssl/private/server.key
- FILEBOT_NODE_HTTPS_CRT=/etc/ssl/certs/server.crt
The filebot-watcher command-line tool watches a given folder and executes the amc script on newly added files. Please read the manual for details and watch the video tutorial to see it in action.
docker run --rm -it -v "data:/data" -v "$PWD:/volume1" rednoah/filebot:watcher /volume1/input --output /volume1/outputThe first argument $1 is the watch folder. The remaining arguments are amc script options.
# docker-compose.yml
version: '3.3'
services:
  filebot:
    container_name: filebot-watcher
    image: rednoah/filebot:watcher
    restart: unless-stopped
    volumes:
      - data:/data
      - /path/to/files:/volume1
command: /volume1/input --output /volume1/output # see amc script usageRun the FileBot Desktop application via xpra and make it remotely available at http://localhost:5454/.
docker run --rm -it -v "data:/data" -v "$PWD:/volume1" -e XPRA_AUTH="password:value=YOUR_PASSWORD" -p 5454:5454 rednoah/filebot:xpra# docker-compose.yml
version: '3.3'
services:
filebot:
container_name: filebot-xpra
image: rednoah/filebot:xpra
restart: unless-stopped
volumes:
- data:/data
- /path/to/files:/volume1
ports:
- 5454:5454
environment:
- XPRA_AUTH=password:value=YOUR_PASSWORD
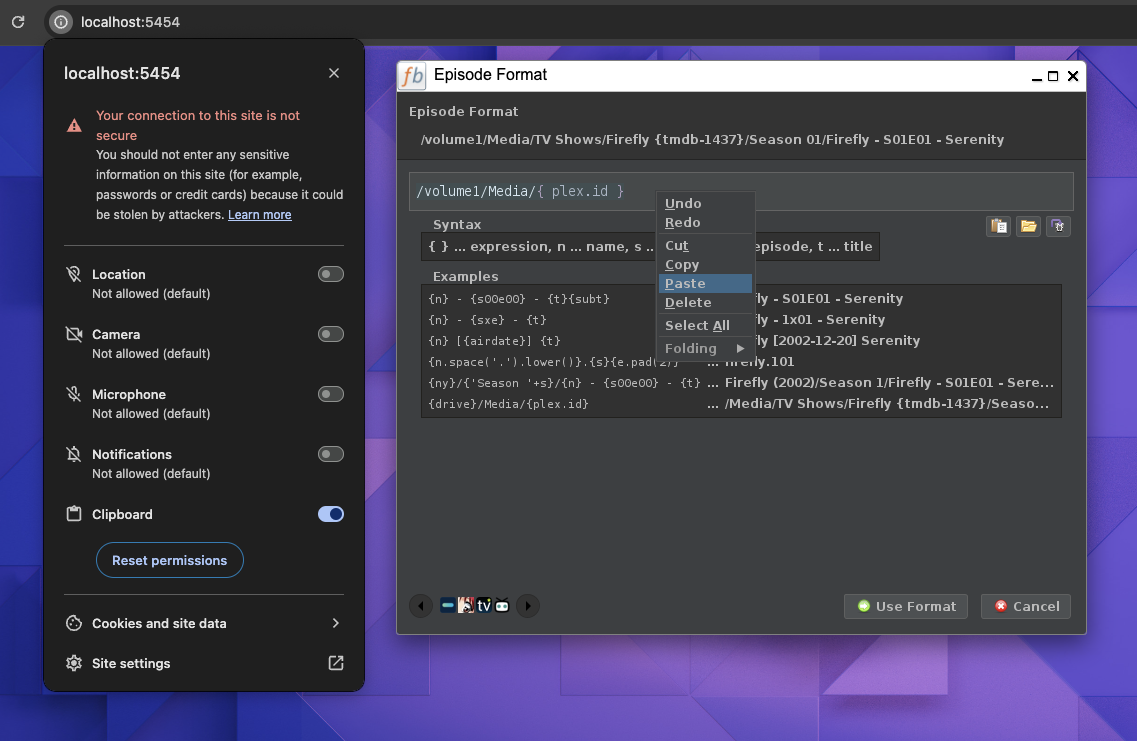
If the clipboard does not work, then you may need to enable Clipboard permissions. If CTRL+V does not work, then you may need to use Right-Click ➔ Paste to paste text from the system clipboard:
If you have a Reverse Proxy that takes care of SSL and authentication, then you can disable authentication via -e XPRA_AUTH=none and disable remote access via -e XPRA_BIND=127.0.0.1.
Run the FileBot Desktop application via JetBrains Projector and make it remotely available at http://localhost:8887/.
docker run --rm -it -v "data:/data" -v "$PWD:/volume1" -p 8887:8887 rednoah/filebot:projector# docker-compose.yml
version: '3.3'
services:
filebot:
container_name: filebot-projector
image: rednoah/filebot:projector
restart: unless-stopped
volumes:
- data:/data
- /path/to/files:/volume1
ports:
- 8887:8887Run an Apache WebDAV Server for remote file system access via http://localhost:8080/.
docker run --rm -it -v "$PWD:/volume1" -e USERNAME=alice -e PASSWORD=secret1234 -p 8080:8080 rednoah/filebot:webdav# docker-compose.yml
version: '3.3'
services:
filebot:
container_name: filebot-webdav
image: rednoah/filebot:webdav
restart: unless-stopped
volumes:
- /path/to/files:/volume1
ports:
- 8080:8080
environment:
- USERNAME=alice
- PASSWORD=secret1234
You can activate your license by calling filebot --license from within the docker container.
# Read License Key from Console Input
docker run --rm -it -v "data:/data" rednoah/filebot --license
# Read License Key from License File
docker run --rm -it -v "data:/data" -v "$PWD:/volume1" rednoah/filebot --license /volume1/T1000.psmYour license will then be stored in -v data:/data (i.e. named persistent volume data mapped as /data in the container file system) which is the persistent application data folder. All your FileBot docker containers must therefore use the same data:/data volume mount so that they can share the same application data folder. Please read Run your app in production ➔ Manage application data ➔ Volumes for details.
If you use -e PUID or -e PGID to run filebot with a different UID then you must use the same -e PUID or -e PGID environment variables when calling filebot --license to install the your license key into the correct user-specific application data folder.
You can enter your OpenSubtitles login details by calling filebot -script fn:configure from within the docker container.
# Read login details from Console Input
docker run --rm -it -v "data:/data" rednoah/filebot -script fn:configure
# Pass login details via Command-line Arguments
docker run --rm -it -v "data:/data" rednoah/filebot -script fn:configure --def osdbUser=USERNAME --def osdbPwd=PASSWORDYour user settings will then be stored in -v data:/data (i.e. named persistent volume data mapped as /data in the container file system) which is the persistent application data folder. All your FileBot docker containers must therefore use the same data:/data volume mount so that they can share the same application data folder.
You can set the environment variables PUID and PGID to run the process with the given UID:
-e PUID=1000 -e PGID=1000environment:
- PUID=1000
- PGID=1000You may use PUID=0 to run as default root user or docker --user:
docker run --rm -it -v "data:/data" -e PUID=0 -e PGID=0 rednoah/filebot -script fn:sysinfoYou can use the --entrypoint option to run bash on startup:
$ docker run --rm -it -v "data:/data" -v "$PWD:/volume1" -e PUID=1000 -e PGID=1000 --entrypoint /opt/bin/run-as-user rednoah/filebot bash
filebot@dcc9dbeac18d:/$ filebot -version
FileBot 4.9.6 (r9125)
docker treats each volume mount as a separate filesystem. Thus, if you are using --action MOVE or --action HARDLINK then the input path and the output path must be on the same volume mount. If you process files across volume mounts, then --action HARDLINK will fail with I/O error: cross-device link, and --action MOVE and --action DUPLICATE will resort to physically copying files.
Please organize your files like so, and then use /path/to/files as volume mount:
/path/to/files/input
/path/to/files/output
-v /path/to/files:/volume1volumes:
- /path/to/files:/volume1